Walk any production floor long enough and you’ll hear the same complaint: air pockets. They show up uninvited in floor coatings, composite layups, and electronics potting assemblies alike — and once they’re locked into a cured part, there’s no easy fix. For sourcing teams that work directly with an epoxy resin manufacturer, knowing the mechanics behind bubble formation is every bit as valuable as negotiating price or confirming lead times.
What follows is a hands-on breakdown of where air actually comes from in an epoxy system, what reliably gets rid of it, and which process variables to watch so the problem doesn’t keep coming back.
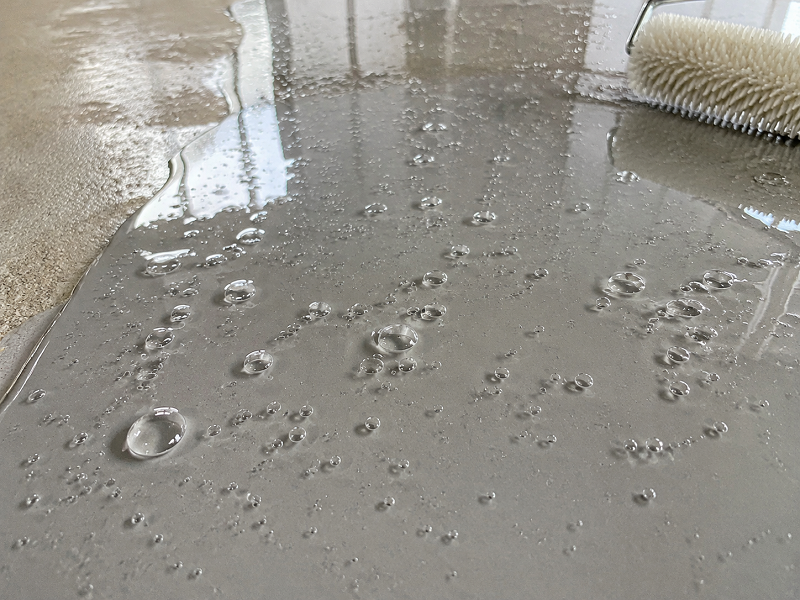
Where the Air Actually Comes From
Blaming “bad technique” rarely solves anything. Bubble problems tend to trace back to one of four specific sources, and identifying which one you’re dealing with changes what you do next.
Mixing turbulence. The moment you combine the resin and hardener, you’re creating opportunities for air entrapment. High-speed stirring is the main culprit — it whips the two components together rather than folding them, and the result is a mixture laced with micro-bubbles that the material’s viscosity then holds in suspension.
Substrate outgassing. Concrete, timber, open-cell foam, and bare metal all behave the same way under warm resin: they breathe. Moisture and trapped gas work their way toward the surface, punching through the wet film and leaving craters or pinhole clusters behind. This catches a lot of installers off guard because the surface looked perfectly dry before they started.
Temperature mismatch. Lay cold resin over a warm slab — or the reverse — and the thermal gradient drives convection through the liquid. Air gets pulled along for the ride, rising in columns that stall just below the gel point if the temperature window closes too fast.
Viscosity that won’t let go. Thick systems simply don’t have the flow behavior needed to let bubbles climb out on their own. They form during mixing and stay exactly where they formed. The resin gels around them before gravity has a chance to do anything useful.
Sorting out which category you’re in is the diagnostic first step. A well-documented epoxy resin manufacturer will have the TDS data to help you assess this — viscosity curves, pot life at temperature, and gel time windows are all clues worth looking at before you change anything else.
Step One: Attack the Problem at the Mixing Stage
Remediation after the fact is always harder than prevention during prep. These habits at the mixing stage make everything downstream easier.
Slow the paddle down. Three hundred to four hundred RPM on a paddle mixer is enough to achieve a thorough blend. Anything faster introduces more air than it’s worth. The motion you want resembles folding batter, not beating eggs.
Scrape the container walls twice. Resin that clings to the sides doesn’t just miss the hardener — it creates pockets of incompletely reacted material that show up later as soft spots or voids. Run a flat scraper along the bottom and sides at the halfway point of your mix time, then again at the end.
Transfer to a second container. It sounds like extra work, but pouring the blend into a fresh vessel and stirring briefly a second time eliminates the unmixed film left behind by the container walls. Professional composite shops do this as a matter of routine.
Bring the resin up to temperature first. Part A sitting at 18°C has noticeably higher viscosity than the same material at 28°C. A short warm-water bath before you open the lid drops the viscosity enough that bubbles climb out far more willingly during and after mixing. Always cross-check the epoxy resin manufacturer‘s processing window — not every chemistry tolerates the same range.
Pull a vacuum when the application demands it. For cast optical components, electrical potting, and anything where a single visible void would mean scrapping the part, vacuum degassing is non-negotiable. Five to ten minutes in a chamber at moderate vacuum removes nearly all entrained air before the material ever reaches the mold. Aerospace and high-reliability electronics manufacturers treat this as standard, not optional.
Step Two: Deal With What Surfaces After Pouring
Even a well-mixed batch will push some air to the surface during its open time. These techniques handle what’s left.
A torch pass, done correctly. A propane or butane torch swept quickly across the surface — never lingering — lowers the local surface tension just enough for bubbles to rupture and the film to close over. The key word is quickly. Dwelling in one spot scorches the surface and can drive yellowing into the cured film. For large industrial pours, a radiant heat lamp gives more even coverage with less operator variability.
A heat gun for thinner systems. Set somewhere between 50 and 60°C, a heat gun works more gently than open flame and suits formulations that are touchy about thermal shock. It takes a bit longer, but it’s a better fit for thin flood coats over decorative substrates where scorching would be visible.
An IPA mist for pigmented work. A light pass of 90-plus percent isopropyl alcohol over the surface breaks tension and pops bubbles without adding heat to the equation. This matters when you’re working with colored pours where a torch could alter the pigment distribution. Keep the application thin — soaking the surface with IPA creates its own problems at the cure line.
Mechanical spreading on horizontal surfaces. On floor applications, a notched squeegee or short-nap roller run across the wet surface shortly after pour does double duty: it breaks near-surface bubbles mechanically while leveling the coating at the same time.
Step Three: Manage the Environment
The room you’re working in has more influence on bubble outcomes than most people account for.
Get the substrate temperature right. The surface you’re coating should sit at least 3°C above the dew point and within a 15 to 25°C band. Cold substrates don’t just slow bubble rise — they can trigger condensation at the interface, which turns into a different set of adhesion problems entirely.
Seal porous surfaces before the main coat. A thin pass of low-viscosity primer over concrete or timber closes the pores that would otherwise keep releasing gas into your topcoat. Many epoxy resin manufacturers that supply industrial floor systems offer primer grades specifically designed for this step — it’s worth asking your contact whether the system you’re using was designed to be applied directly or over a sealed base.
Keep humidity in check. Amine-based hardeners are particularly sensitive to moisture in the air. Above 75% relative humidity, you start seeing surface bloom, cloudiness, and micro-blistering alongside the bubble issues. If you can’t control the space, choose a moisture-tolerant hardener grade — most epoxy resin manufacturers offer options rated for higher-humidity installation conditions.
Hold temperature steady through the cure window. A pour that gels in a 22°C room and then cools to 14°C overnight because the heating went off will move through thermal contraction that can reopen voids already partially healed. Consistent ambient temperature through the initial cure period pays dividends in surface quality.
Step Four: Match the Resin to the Job
This is the lever that gets underused most often. Choosing a formulation that was designed for your specific application scenario removes a lot of the struggle from the other steps.
Low-viscosity infusion grades are built around air release. Their entire processing logic — vacuum infusion, resin transfer molding — assumes that air is being actively evacuated. The flow characteristics of these materials let them wet out fiber reinforcement with minimal air entrapment at the fiber-resin boundary.
Self-leveling floor systems typically include surfactant packages that help the wet film shed bubbles at the surface without operator intervention. The bubble behavior in a purpose-built flooring resin looks very different from what you’d get using a casting grade on a horizontal pour.
Extended pot life or low-exotherm systems buy time. Slower hardeners let the material stay fluid long enough for bubbles to find the surface before the viscosity climbs. This matters most in thick section pours, where the combination of depth and exotherm in a standard system can lock air in place before it has anywhere to go.
A epoxy resin manufacturer worth working with will ask about your application before recommending a grade. When you reach out for samples or pricing, bring the specifics: how you’re applying it, what substrate you’re going on, how thick the pour is, and what the ambient conditions look like. That information changes the recommendation.
When the Problem Keeps Coming Back
Systematic bubble defects after best-practice processing usually point to something in the environment or the substrate that hasn’t been addressed. This table maps the common patterns:
| What You’re Seeing | Most Likely Source | Where to Start |
|---|---|---|
| Bubbles appearing 2–4 hours after pour | Substrate still outgassing | Primer coat; slow down moisture cure on slab |
| Air concentrated near the bottom of a cast part | Mold or substrate below ideal temperature | Preheat to 20–25°C before pouring |
| Uniform bubble distribution throughout the pour | Mixing introduced the air | Drop RPM; switch to two-container method |
| Pinhole clusters on a floor surface | High ambient humidity during application | Dehumidify; swap to moisture-tolerant hardener |
| Bubbles return after torching | Substrate outgassing not stopped | Seal substrate; reduce single-pour depth |
If none of these adjustments moves the needle, the conversation needs to shift to chemistry. Get a technical rep from your epoxy resin manufacturer on-site or on a call. The better suppliers keep application engineers available for exactly this — someone who can look at your batch records, walk your process, and figure out whether the formulation, the substrate, or the environment is the root cause.
What to Take Away From This
Reliable, bubble-free results don’t come from one technique. They come from four things working together: a formulation selected for the application, a mixing process that doesn’t introduce air unnecessarily, a substrate that’s been prepared to stop outgassing, and an environment that stays stable through the cure.
For industrial buyers, that starts at the sourcing stage. The epoxy resin manufacturer you work with should be able to hand you a TDS with real processing parameters, connect you with technical support when something goes wrong, and offer grades that fit your actual process rather than the nearest shelf product. Before committing to volume, run a documented trial under your real conditions — temperature, substrate, equipment, crew. What works in a controlled lab setting often behaves differently when it meets a real job site.
Bubble problems are fixable. But they’re fixed most efficiently by people who understand what caused them — not by running the same process harder and hoping for a different result.