The river table is very popular in home furnishing and DIY circles due to its superb appearance. It is usually made of natural wood boards, deep cast epoxy resin, and table top epoxy resin. The middle of the table top looks like a flowing “river”, which not only retains the natural texture of the wood, but also adds a sense of modern art. Many people want to try to make a river table of their own, but they think it is very difficult to make. In fact, as long as we master the core steps, we can easily make our own exclusive river table, and we no longer need to spend a lot of money on finished products.
So, today, Jinghua will introduce the entire production process in detail from material preparation, production steps to practical techniques.
First of all, you must have all the materials to make the river table. The main materials include solid wood boards, deep pouring epoxy resin, tabletop epoxy resin, resin-specific color paste, color essence, wood board edge sealing material (board or sealing tape), release agent or tape; live edge (natural edge) is preferred for wood, because the natural edge can create a more realistic “river bank effect” , Secondly, walnut and ash are suitable, with clear texture and strong stability; in terms of tools, prepare sandpaper (80-400 mesh), clamps, stirring rods, measuring cups, silicone molds, heat guns, as well as protective gloves and masks.
Before officially pouring resin, first check the moisture content of the wood. We need to control the moisture content of the wood between 8% and 12%. If the moisture content of the wood is too high, bubbles may easily occur during the resin curing process. If it is your first time to make a river table, it is recommended to buy dry and flat boards directly to avoid the trouble of drying and leveling, and to avoid cracking and deformation later.
The first step is to treat the wood, which is one of the key steps in determining the appearance of the river table. Cut the wood to a suitable size according to the storage space at home, then use a chisel to remove the bark on the surface of the wood, and then sand it with 80-grit coarse sandpaper to smooth out the burrs and uneven areas on the surface. Then change to 180-grit and 400-grit fine sandpaper and gradually polish until the wood surface is smooth and delicate, and there is no rough feeling to the touch. After sanding, be sure to wipe off the sawdust with a dry cloth to avoid resin being mixed in later and affecting the appearance. If the wood has cracks or knots, fill them with a small amount of resin and let them dry before sanding them smooth.
The second step is to build the mold to prevent resin leakage. Use MDF board or melamine board to build a mold that matches the size of the wood. Paste a layer of anti-stick tape on the inner wall of the mold, and then apply silicone sealant to the joints. This step must be done carefully, otherwise the resin will easily leak during pouring. Then put the two polished pieces of wood into the mold and fix them with clamps to keep the wood level. Leave a gap between the wood. This gap is the position of the “river”. The width of the gap can be adjusted according to your own preferences. The wider it is, the more visual impact it will have.
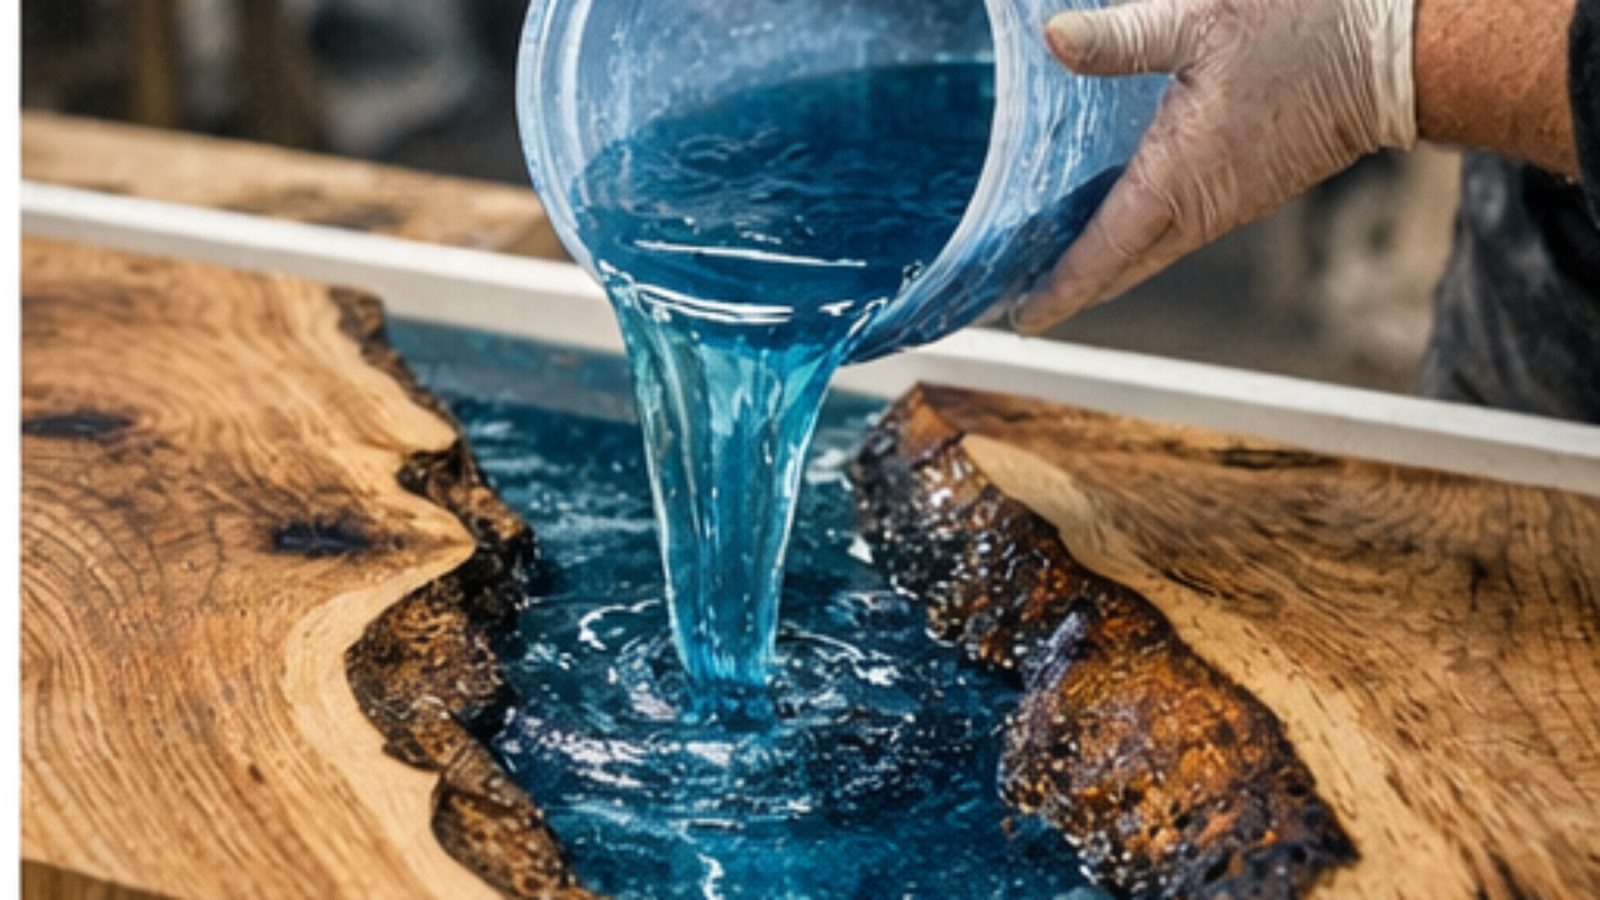
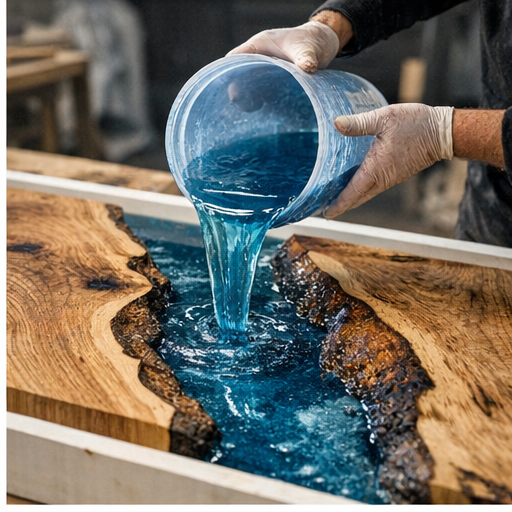
The third step is pouring the resin, which is the most fulfilling part for most people. We first mix the epoxy resin according to a fixed ratio, such as a 2:1 or 3:1 ratio of resin to curing agent (the ratio may be different for different brands, be sure to read the instructions). Pour it into a measuring cup and stir slowly. The stirring time is controlled at 2-3 minutes. Do not mix too fast to avoid excessive bubbles. If you want to make a colorful river, you can add a small amount of color paste, color essence, pearlescent powder and other toners to the mixed resin, and stir evenly. Beginners are advised to choose light blue or light cyan, which is close to the color of natural rivers and is not easy to fail.
After mixing the resin, the formal pouring begins. Slowly pour the resin into the gaps in the wood. If you want the river table to be thicker, it is recommended to pour it in layers. For example, each layer is 1-2 inches. Waiting for the first layer to be semi-cured before pouring the next layer can effectively reduce problems such as bubbles and cracks. For each layer of pouring, use a hot air gun to gently blow the surface to remove bubbles, wait 4-6 hours to reach a semi-cured state, and then pour the next layer of resin. This can avoid cracks caused by shrinkage of the resin. After the pouring is completed, cover the mold with a dust-proof cloth and place it in a dry environment at about 20°C to allow the resin to solidify naturally. Wait for at least 24 hours. Do not rush to demould. Incomplete curing will cause the surface to become soft and deformed.
The fourth step is to polish and polish the river table to make it more textured. After the resin is completely cured, remove the mold and sand the tabletop with 80-grit sandpaper to smooth the connection between the resin and the wood. Then gradually sand it with fine sandpaper until the tabletop is smooth and traceless. Finally, wipe the tabletop with polishing paste, or apply a layer of wood wax oil, which can not only improve the gloss, but also protect the wood and resin and extend its service life. If you want to make the river table more stable, you can also install metal table legs, which is simple and elegant.
Generally speaking, making a river table is not as complicated as imagined. The key is to master the core details and have enough patience. Even a DIY novice can make a very beautiful river table.
Finally, if you need deep pouring epoxy resin to make a river table or have related questions during the production process, welcome to consult jinghua, we have the most professional engineers and salesmen to serve you.