Here’s something most first-time buyers find out the hard way: the resin that gave your bar top a flawless finish will likely crack, cloud, or overheat the moment you try to use it for a river table. These are different materials solving different problems, and lumping them together under “epoxy resin” is where projects go sideways before they even start.
Deep pour epoxy resin has one job — handling thick, single-pass casts cleanly. Getting that job right involves more than just picking the highest-reviewed product on a supplier’s website. This guide breaks down what actually separates a solid deep pour epoxy from one that looks good on paper, what to watch for when comparing specs, and the mistakes that catch out even experienced woodworkers and resin artists.
So What Actually Makes Deep Pour Epoxy Different?
The short version: chemistry designed around heat management.
When epoxy cures, it generates heat. In thin coats, that heat escapes quickly and nothing bad happens. Push the same formula into a 3-inch-deep mold and the heat has nowhere to go — it builds up in the center of the pour, causing the resin to crack, go yellow, or develop a foggy haze through the middle. The finished piece looks fine on the outside and is ruined on the inside.
Deep pour epoxy resin — also sold as casting resin or thick-set epoxy — gets around this with a slower-reacting hardener and a lower-exotherm formula. The curing reaction still produces heat, but it’s spread out over a longer window, giving it time to dissipate before it concentrates enough to do damage. The tradeoff is cure time: where a surface coat might be touch-dry in 12 hours, a proper deep pour epoxy typically needs 48 to 72 hours before it can be demolded, and a full 7 to 14 days before it reaches its working hardness.
Standard tabletop epoxy maxes out around a quarter inch per layer. A good deep pour epoxy resin handles 2 to 4 inches in a single pass. Industrial formulas go further — some push to 6 or even 8 inches — but those are purpose-built for specific commercial applications, not general woodworking.
What to Actually Look at When Comparing Products
Most product pages lead with pour depth. That’s fine, but it’s only one piece of the picture — and it’s also the number most likely to be inflated. Here’s what deserves equal attention.
Pour depth — but verify it. A stated 4-inch pour depth is only meaningful if it holds up across real working conditions, not just a controlled lab pour at optimal temperature with a small volume of resin. The brands worth trusting publish a technical data sheet (TDS) that specifies pour depth alongside pour volume limits and temperature ranges. If that documentation doesn’t exist, treat the headline claim with skepticism.
Viscosity — the spec most people skip. For deep pour epoxy, viscosity in the 200–600 mPa·s range is where you want to be. Low-viscosity resin flows into tight gaps, wraps around embedded objects completely, and lets air bubbles travel to the surface without intervention. Thicker resin traps bubbles and fights you during the pour. This number matters more than it looks like it should.
Working time. A river table with live-edge wood and a pigmented fill isn’t a fast operation. You need time to mix, pour, position any objects, adjust color gradients, and deal with unexpected issues. Sixty minutes of working time is the floor for anything complex; 90 to 120 minutes is better. Products with shorter working windows are harder to use on larger or more detailed pours.
UV resistance — built in, not bolted on. Every deep pour epoxy resin will eventually yellow if exposed to UV without protection. The question is whether UV inhibitors are part of the base formula or whether the product just recommends a UV-blocking topcoat afterward. Built-in inhibitors offer more consistent protection across the full depth of the cast; a topcoat only protects the surface. If the spec sheet doesn’t mention UV resistance at all, assume yellowing resistance wasn’t a formulation priority.
Bubble behavior. A well-formulated deep pour epoxy largely takes care of its own bubbles. The combination of low viscosity and a slow cure schedule gives air plenty of time to rise out naturally. One pass with a heat gun or butane torch in the first hour handles stragglers. If a product requires constant monitoring and repeated torch work throughout the pour, that’s a signal the viscosity is fighting the application.
Certifications — particularly for food-adjacent surfaces. Kitchen countertops and dining tables sit close enough to food that this matters. BPA-free formulation, low VOC content, and recognized compliance marks — FDA, REACH, ROHS, EN71 — are worth checking before committing to a product. A reputable manufacturer will supply SDS documentation on request without making you hunt for it.
Where Deep Pour Epoxy Actually Belongs
Deep pour epoxy resin is the right call for a specific set of projects. Knowing where it earns its place — and where you’re better off with something else — prevents expensive mistakes.
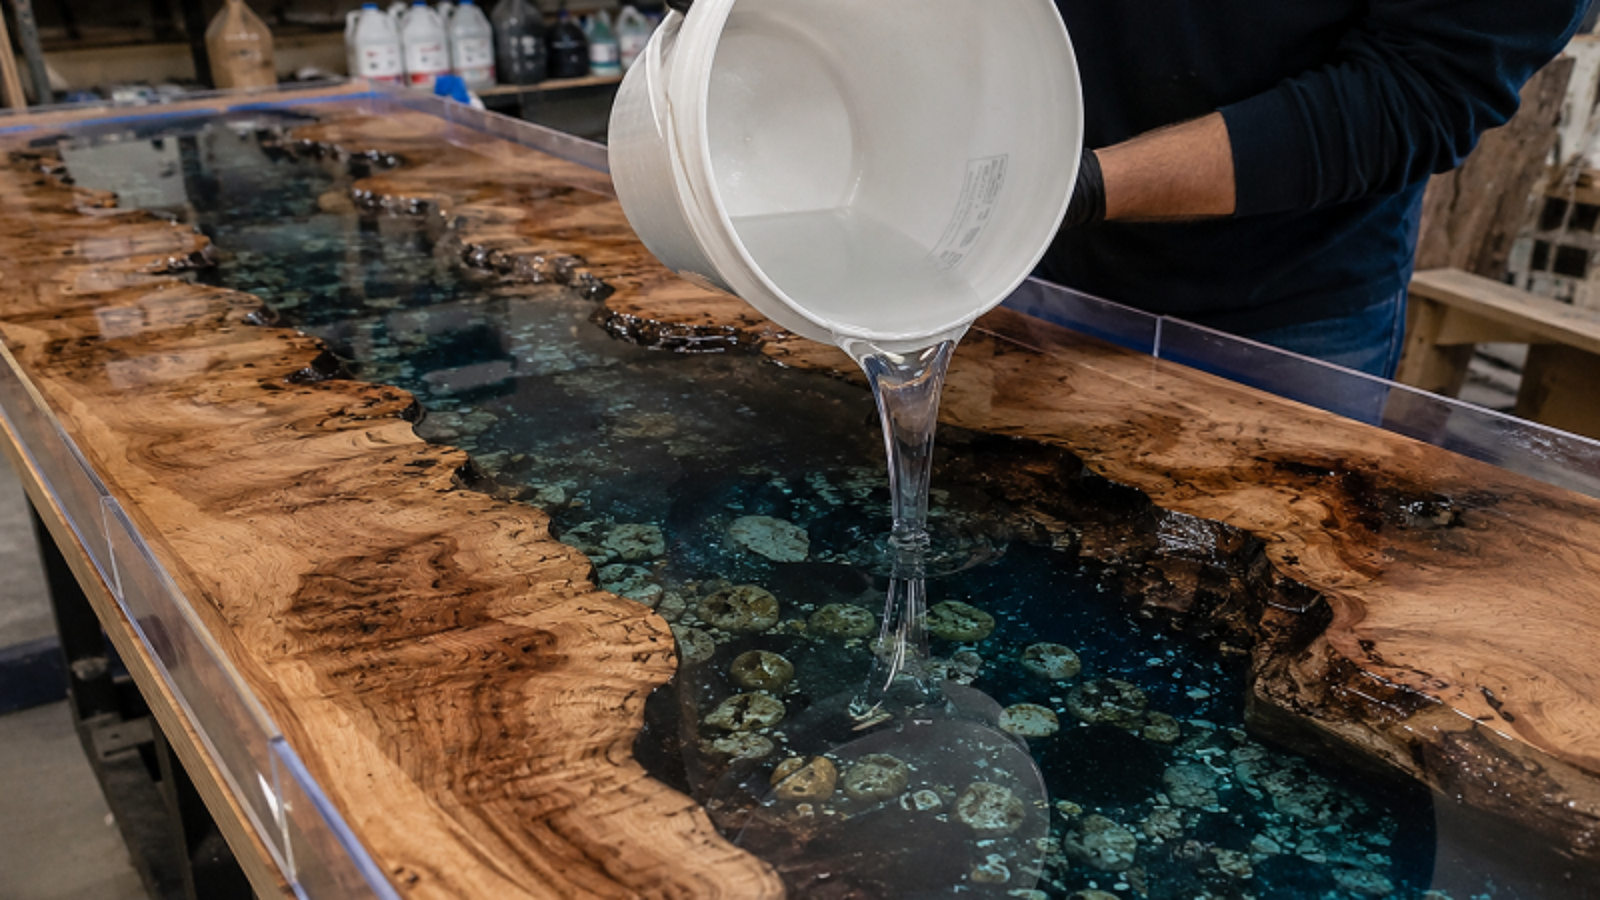
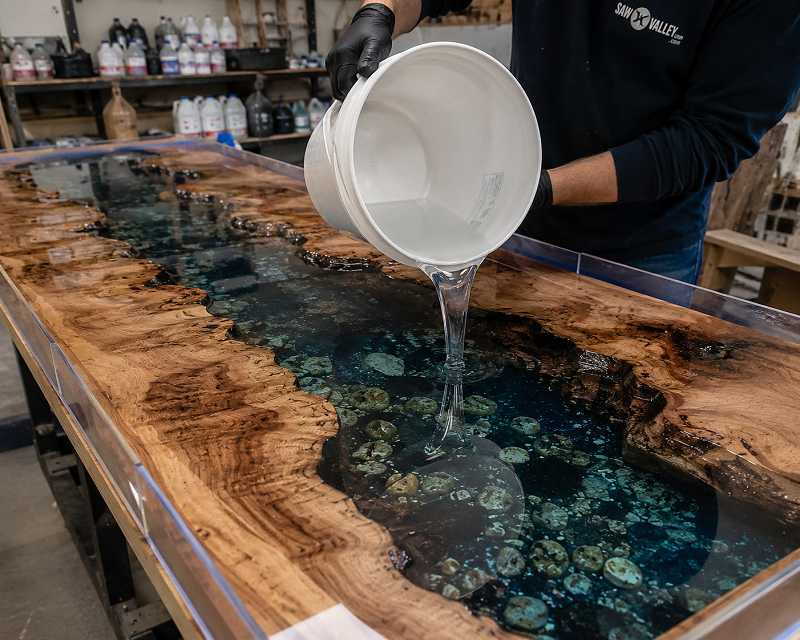
River tables are the obvious one. You’ve got a live-edge slab, a gap in the center, and you need to fill that gap to the full depth of the wood — typically 1.5 to 3 inches — in one clean pour. Standard epoxy physically cannot do this in a single pass. Deep pour epoxy can, and it’s what the application was designed for.
Casting with embedded objects is where the long working time really earns its keep. Dried flowers, insects, coins, fossils, photographs — anything you want permanently suspended in clear resin needs time to place properly. Low viscosity means the resin flows around the object rather than pushing it out of position, and 90 minutes of working time means you’re not racing the clock.
Thick resin art — sculptural pieces, deep ocean pours, large abstract castings — requires volume and depth that standard art resins can’t handle. Deep pour epoxy resin is the material that makes these pieces structurally possible.
Wood void and crack filling on natural slabs often involves depth. Rather than stacking multiple thin coats and waiting for each to cure, one application of deep pour epoxy fills the void completely.
Where it doesn’t belong: surface coatings, floor coatings, and countertop topcoats. These applications need a harder, faster-curing surface resin. Using deep pour epoxy as a topcoat gives you a softer, slower finish that wasn’t optimized for surface wear — it’s the wrong tool for the job.
The Techniques That Separate Good Results from Wasted Pours
The resin can only do so much. Technique accounts for a significant share of whether a deep pour epoxy project comes out right.
Seal the wood first. Wood holds trapped air and moisture. Without a seal coat — any standard surface epoxy works here — that air bubbles up through your pour and leaves a trail of voids behind it. Apply a thin seal coat, let it cure fully, then proceed with the deep pour epoxy. On live-edge slabs with open grain and deep figure, skipping this step is almost always regretted.
Work within the temperature window. Most deep pour epoxy resin formulas are calibrated for 70°F to 80°F (21°C–27°C). Drop below 65°F and the cure slows down considerably — you’ll also see an uptick in surface cloudiness. Push above 85°F and the exothermic reaction speeds up, which on larger pours can mean overheating in the center. Cold shop? Warm your resin and hardener in separate containers of hot water, bring them back to room temperature, then mix.
Measure by volume, not by feel. The 2:1 ratio (resin to hardener) that most deep pour epoxy formulas use needs to be accurate. Off-ratio mixing is the leading cause of surfaces that stay tacky or fail to cure fully, even days after the pour. Use graduated measuring cups — proper ones, not kitchen cups. Add resin first, hardener second.
Mix slowly and completely. Six to eight minutes of thorough stirring, scraping the sides and bottom of the container throughout. Rapid mixing whips air in; a slow, folding motion keeps the mixture clear. Once you’ve finished in the first container, transfer everything to a second clean one and stir for another minute or two. Unmixed streaks on the container walls are the enemy.
Protect the cure without sealing it. A simple cardboard tent over the piece keeps dust and debris off the surface without trapping heat. Full covers — plastic sheeting laid directly over the mold — hold heat in and can cause problems in the center of large pours. Let it breathe. Initial surface hardness at 48 to 72 hours; structural cure in 7 to 14 days. That timeline is real and shouldn’t be compressed.
Deep Pour vs. Table Top: The Side-by-Side
This comparison generates a lot of search traffic because people genuinely mix these up. Here’s the actual breakdown.
Layer thickness: Deep pour epoxy — 2 to 4+ inches per layer. Table top epoxy — roughly 1/8 to 1/4 inch per layer.
Cure timeline: Deep pour — 48–72 hours to demold, 7–14 days to full hardness. Table top — 12–24 hours to touch, 3–5 days to full cure.
Viscosity: Deep pour sits lower for free-flowing mold behavior. Table top runs slightly thicker so it stays put on flat surfaces without creeping over edges.
Heat tolerance: Deep pour is built for low exotherm in thick sections — that’s the whole point. Table top epoxy poured thick will overheat. It’s not a workaround.
Surface hardness: Table top epoxy cures harder and more scratch-resistant — the right call for a surface that sees daily use. Deep pour trades some surface hardness for the optical clarity and pour depth the application requires.
On a typical river table build, both products show up. Deep pour epoxy resin handles the river channel fill. Once that’s cured and sanded flat, a flood coat of table top epoxy goes over the entire surface to bring the hardness and gloss up to where a working dining table needs to be.
What Separates Good Deep Pour Epoxy Resins in 2026
The deep pour epoxy market has settled into a clearer shape over the past few years. The products that hold up under scrutiny tend to share a few traits that are easy to verify before you buy.
Published TDS documentation that specifies pour depth under actual working conditions — not just a maximum figure. Third-party certifications rather than self-declared compliance: ISO9001 for manufacturing consistency, REACH and ROHS for chemical safety, BPA-free where food contact surfaces are involved. Accessible technical support that answers questions about cure schedules and project-specific situations, not just a FAQ page.
For commercial buyers and production-scale users, the stronger manufacturers also offer OEM and private label options, batch-level quality documentation, and drum-quantity shipping without the per-unit markup that comes with retail packaging.
The Short Version
Deep pour epoxy resin is a precision material. It handles applications nothing else can — river table fills, thick casts, deep embedments — but it gives back exactly what you put in. Use the right product for the depth you need. Work at the right temperature. Mix accurately and mix thoroughly. Give it the full cure time.
Before buying anything, pull the TDS. Compare viscosity and working time alongside pour depth. Price per unit is the last thing to optimize for — a cheaper resin that doesn’t perform costs far more than the price difference once you’ve wasted a slab and started over.